Hello Simmers!
I am going to be creating a series of tutorials for those who are new to custom content. This is the first tutorial you should do, as it goes into detail about every necessary step. The tutorials that follow will not be as detailed, so it's important for you to do this one first if you are brand new to creating custom content for the Sims 4 to get a baseline of how creating custom content works.
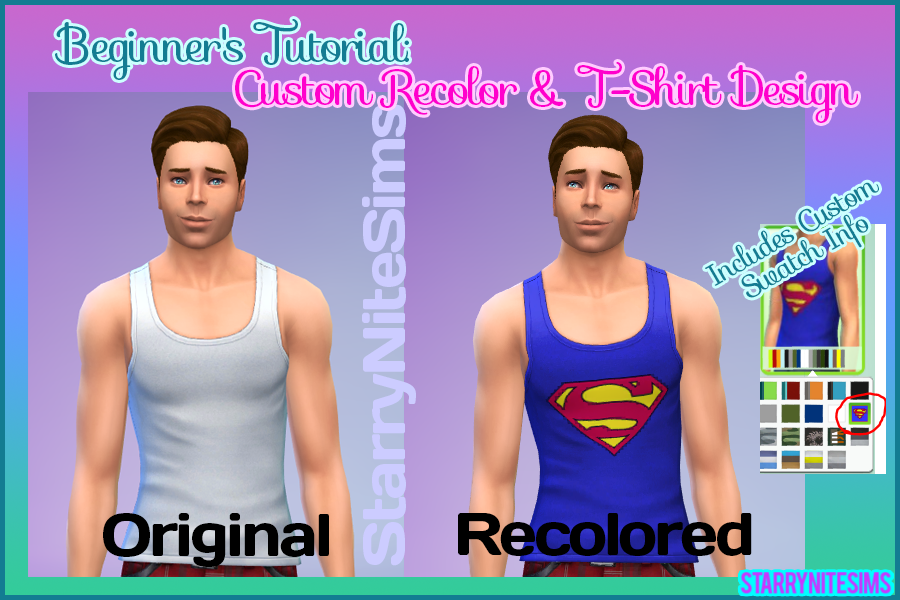
The Sims 4: Beginner's Tutorial - Custom Recolor and T-Shirt Design by StarryNiteSims
So what we'll be creating today is a very simple recolor of a tank top for males and we're going to put a little design on it as well!


I am going to be creating a series of tutorials for those who are new to custom content. This is the first tutorial you should do, as it goes into detail about every necessary step. The tutorials that follow will not be as detailed, so it's important for you to do this one first if you are brand new to creating custom content for the Sims 4 to get a baseline of how creating custom content works.
The Sims 4: Beginner's Tutorial - Custom Recolor and T-Shirt Design by StarryNiteSims
So what we'll be creating today is a very simple recolor of a tank top for males and we're going to put a little design on it as well!
Materials Needed
- Photoshop - I am using Photoshop CC but you should be able to follow along with most versions. You can also use GIMP, Paint Shop Pro or similar programs if you like, but this tutorial is based in Photoshop.
- DDS Texture Tools for Photoshop - If you are using GIMP or PSP you may be able to find DDS plug-ins for those programs by googling. Basically you need to be able to open/save DDS files.
- The Sims 4
- 7zip - You will need to extract the S4PE files using 7zip! Using another program will not work.
- This Superman graphic: Download Here or just right click the image and 'save as'
Preparations
Create Sub-Folders under Mods Folder
You need to begin by setting up a couple of folders which will make things a bit easier and will help you stay organized. Let's start by creating some sub-folders within our Sims 4 Mods folder. This will help organize our CC so that if there are problems later on, we'll be able to better isolate it. It's important to note that you cannot have sub-folders within those folders. Let me explain that a bit better. Under your Mods folder, you can have sub-folders for things like tops, bottoms, eyes, lips, tattoos, female hair, male hair, etc. You can create as many of these types of folders as you like. However you cannot then create sub-folders WITHIN those such as Mods -- Bottoms -- Skirts. So organize them however you like with that in mind. Just navigate to Documents -- Electronic Arts -- The Sims 4 -- Mods and start creating those.
Create a "Working Files" folder
Now let's create a folder which we'll be using to store some files while we're working on them so that they don't get lost. This is also helpful because you can easily delete unnecessary files when you're finished working on them. You can create this anywhere you like - the desktop or within your documents folder is fine. Call it something like "Working Files".
Create a "Completed Files" folder
This folder is where we will store our finished texture files after we've edited them, before we turn them into actual .package files used in the game.
Create a "Completed Files" folder
This folder is where we will store our finished texture files after we've edited them, before we turn them into actual .package files used in the game.
How to Open Color Magic & S4PE
Once you have downloaded and installed Color Magic & S4PE, put the folders onto your desktop for easy access. For some reason when I tried to drag the actual exe files for the programs onto my desktop, it wouldn't work. I had to leave it in the folder and just put the folder on my desktop. Not sure if this was my computer or operating system, or if that's just how that program works, but I thought I would tell you in case someone else runs into the same issue.
*Make sure you use 7zip to extract the S4PE files!!! This is a crucial step!
*Make sure you use 7zip to extract the S4PE files!!! This is a crucial step!
Okay are you ready? Let's go......
Step 1: Creating the Package File
Open up Color Magic. On the first screen, click NEXT. Now you should have this screen:


Make sure that The Sims 4 is selected, type in your own unique Creator Name and then click Next.
On the next screen, you need to decide which item from the game you want to recolor. For this tutorial, I've chosen a tank top for young adult males. Make sure you select the same settings I have above. Young Adult, Male, Tops and click the filter checkbox beside each one. Over where it says Search for, type in "tank" and then select the one from the list that I've highlighted above: ymTop_Tank_White and click next.
On the next screen, where it says Unique Item Name, you can change this if you want. There's really no reason to - as this won't be the final name for our tank top, so I just left it as is. For Color Swatch, click "Add" because we're going to be creating our own custom swatch as well! Now click Finish. Navigate to your Working Files folder that we created earlier, and click Save. Color Magic will automatically close.
Step 2: Extracting the DDS (texture) File from S4PE
Open up S4PE. You will most likely get an error message regarding updates. Just click ok. Go to File -- Open and navigate to your Working Files folder (or wherever you saved the package file to in the previous step). Locate your package file. Mine was StarryNiteSims_ym_Top_Tank_White. Click it and then click open.
Select the first file in your list, which is the actual texture file (shows the picture of the clothes on the right). This is the one we want! Now right click it, and select Export to DDS. Navigate to your working folder, if necessary, and name the file supermantankmale and click Save. Now, MINIMIZE S4PE (do not close it). We will need it again later.
Step 3: Editing the DDS File in Photoshop
Fire up your Photoshop. First we're going to open up the Superman image, so go to File -- Open and navigate to where you saved the file to, select it and click Open. Next we're going to open up our DDS file (Texture file) so again, File -- Open and navigate to your "Working Folder", select the "supermantankmale" file and click open.
*At this point, if you get an error message telling you that you can't open that type of file, it means that your DDS Plug-ins did not install correctly. You need to correct this before you can proceed.
You should get a dialog box like this. Just leave the settings as they are and click NEXT.
Zoom in a few times so that you can see what you're doing. Your screen should look like this....
We're now going to colorize our shirt so that it's blue instead of white. Go to Layer -- New Adjustment Layer -- Hue/Saturation. Click OK when the little box pops up. In the properties box, you will want to have the following settings in order to get the same shade of blue that I did. Feel free to play with the sliders though until you get a color that you like. Make sure COLORIZE is checked first, and then type in: Hue: 241, Saturation: 76, Lightness: -37
Now we're going to edit the layer over in the layer panel. With your Hue/Saturation layer selected, you need to now change your settings as follows: Multiply, Overlay or Soft Light. Play around with these settings if you like, to get the color you want to achieve. I chose Multiply. Now set the Opacity to 90%. This allows you to still see the wrinkles of the shirt and makes the shirt not quite as bold, which looks more natural.
So far so good......
Now we're going to add the Superman image to our shirt! There are multiple ways of doing this, and it may vary depending on the program you're using and the version. The basic idea is that we want to copy the Superman image and get it onto the shirt image as a new layer that we can adjust. So the easiest way I've found is to go to the Superman image, make sure the Move Tool is selected  and click and DRAG the superman image up to the supermantankmale tab. Keep holding the mouse button down and position the superman image over the shirt and let go of the mouse button. This basically drags and drops the image over to your blue shirt.
and click and DRAG the superman image up to the supermantankmale tab. Keep holding the mouse button down and position the superman image over the shirt and let go of the mouse button. This basically drags and drops the image over to your blue shirt.
It should look something like this....
Now hold down shift and click one of the corner handles and drag it inward, making the Superman image smaller. Holding down shift allows you to keep the image ratio the same, so that it doesn't end up looking like this:
So once you've gotten the symbol positioned the way you want, go over to your layer panel and lower the Opacity down to 80%. We're not going to choose multiply, overlay or soft light this time. They give a cool effect though - so feel free to use it if you like it!
So now you should have something like this....
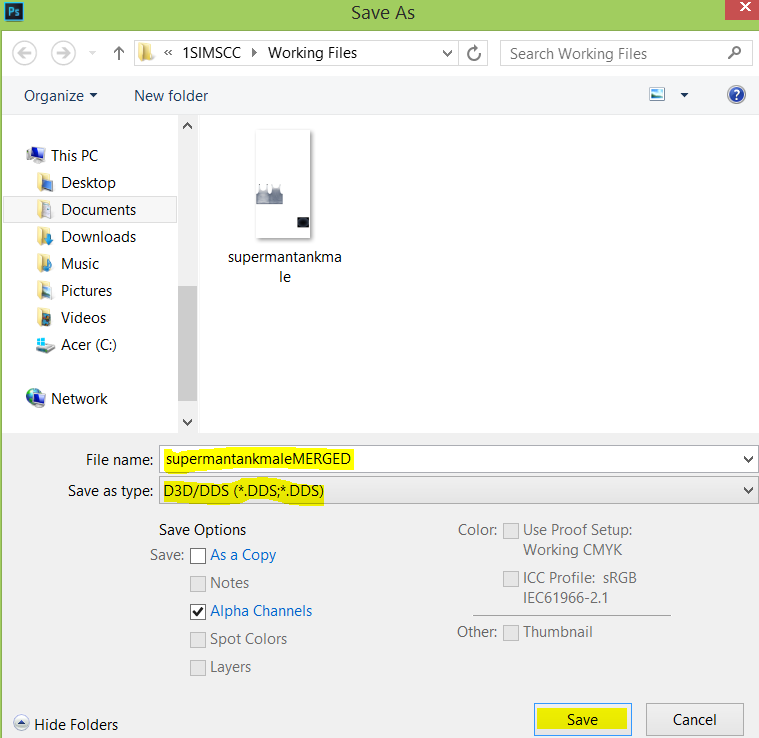
All that's left to do now is to merge the layers and save the file. So go to Layer -- Merge Visible. Now go to File -- Save As. Navigate to your Working Files folder. Make sure DDS is selected and name the file "supermanshirtmaleMERGED" and click Save.
The next dialog box that pops up should look something like this. Make sure DXT5 is selected and also Generate MIP Maps is selected and click Save.
Now go back to your supermantankmaleMERGED file for a moment before closing it. Click File -- Step Backward which will undo the merge. Go to File -- Save As and save it as a .PSP file so that if you later decide you need to change the position of the Superman symbol, or perhaps you want to change the shirt color or anything else, you will be able to do so without starting from scratch. Just save it as supermantankmaleUNmerged or supermantankmaleEDITME or something to let you know that it's the one you can go in and edit. Once you've saved it both ways, you can close it out. Keep that superman graphic up though! We're about to use it again....
Step 4: Creating A Custom Swatch Image
Now we're going to create a custom swatch so that when we go to view the shirt in CAS, we can easily identify which shirt is the Superman one we've created. Here's what the finished swatch will look like in CAS:
*I have also created a more detailed custom swatch tutorial so that you can get a really customized look and also use the same swatch template over and over again, only making minor changes for each piece of custom content that you make. You can find that tutorial here: Detailed Custom Swatch Tutorial
While still in Photoshop, go to File -- New and use these settings to create a 32 x 32 pixel image with a transparent background:
Zoom in so that you can see it better (I zoomed in 4 times). Now here's where you can get really creative, depending on what you'd like your custom swatch to look like. You can do a solid color, gradient, text to identify you as the creator, a tiny image or any combination of the above. You can also save this image as a .PSP file for later use, so that you don't have to create a new 32 x 32 image every single time you want to create a piece of custom content.
So for this tutorial, we want to just have a blue background with a tiny superman image on it, and a red outline. Here's how to accomplish that.
Go click on your Fill tool (the paint bucket tool) and then choose a color. It doesn't have to be the exact same color of blue that you used for the superman shirt, because it's so tiny - but of course it can be if you'd like. I just went with a very similar blue color. Now click in the image to fill it with this blue color. Now we want to add an outline. Go to Edit -- Stroke and change the width to 2 px, color should be a bright red and location should be "inside" like so...
Now go back to the superman image that you had originally opened. Drag it onto this new 32 x 32 image to bring it on over. It's going to be HUGE compared to our little 32 x32 image. So zoom way out, and that will allow you to resize the superman image just like we did before, on the shirt. So make it very small (remember to hold down shift so that it doesn't get all wonky!).
Once you position it correctly, you can zoom in and out until you get it looking the way you want it to. My result looked like this when I zoomed it back out to 100%
Now go to Layer -- Merge Visible and then File -- Save As. Navigate to your working folder and name this file supermanswatch. Save it as a DDS file just like before, only our settings will be a little different. This time make sure DXT1 (no alpha) is selected. Generate MIP Maps also still needs to be selected.
Click Save. A box will pop up saying "Alpha information will be lost". Just click OK. Now we're done with Photoshop and you can close it.
Step 5: Creating the final Package File and Adding it to the Mods folder
Bring back up S4PE and right click on the texture file again, only this time select Import from DDS. Navigate to your Working Files folder and choose the file named supermantankmaleMERGED and click open. It will pop up a box that says Resource has been updated. Commit changes? Say YES.
Don't panic when you get to this point. It may look like something went terribly wrong. Stuff got crossed out and you see something about an "error". Just relax, we're all good. :) This is what it will look like:
Now time to add our custom swatch! Go right click on the _IMG file and select REPLACE. Navigate to your Working Files folder and choose the supermanswatch file.
Now we need to save this as a package file again, only this time this is the one that we'll actually put into our Mods folder so that we can check it out in the game!!
So go to File -- Save As and navigate to your Mods folder. Documents -- Electronic Arts -- The Sims 4 -- Mods. Name the file whatever you like. You may want to include your own username/handle in there as well so that people will know you made it! I chose StarryNiteSims_supermantank. Now you can close out S4PE.
Step 6: Testing Your Custom Content Out in The Sims 4
Open up The Sims 4 game and jump right into CAS and choose a male sim. Locate the Superman shirt and try it on! How does it look? I hope you enjoyed this tutorial! I'll be creating additional tutorials. If you experience any problems, please find me on my Tumblr at http://starrynitesims.tumblr.com. I would also LOVE to see what you made from my tutorials so please use hashtag #starrynitesims on tumblr or the gallery!
It's a bird.....it's a plane....no....it's SIMperman!!! (yes, I'm a dork)
Happy Modding!
*Jenna*
Hi,
ReplyDeleteI can't find the image file in S4PE to create the custom swatch. What do I do ?
Thanks,
Resilient
When you're in Color Magic, you have to make sure that you click "add" to add the custom swatch. You should see the little CM swatch appear when you do. If you've done that, and it's not showing the swatch in S4PE then I'm not sure why that would be. If you tell me what item you're trying to create, I can try it myself and see if I get the same error!
ReplyDelete